

The web hasn’t just given us the opportunity to buy products from anywhere in the world; it has also given us the opportunity to read feedback from previous purchasers instantly. How would we possible shop on Amazon without being able to read product reviews?
Reviews are a key part of ecommerce.
And now Google is changing the way they handle consumer reviews.
In April, Google replaced their longstanding Google Trusted Stores Program with Google Customer Reviews.
Getting on top of Google’s new review format will be crucial for the success of online store owners. That’s why today we’re going to breakdown Google Customer Reviews and teach you everything you need to get started.
Here’s what you’re going to learn:
- How Google Customer Reviews is different from Google Trusted Stores
- How Google Customer Reviews Work
- What’s good and bad about the new system
- How to migrate from Google Trusted Stores
- How to integrate the new review system into your online store
What is Google Customer Reviews
Google Reviews lets you gather and display reviews from your customers. Reviews are gathered using Google customer surveys that are automatically sent to shoppers who have made a purchase from your online store. The ratings will be displayed on your Google Shopping ads and there is also a Google Customer Reviews badge that you can display in your store. The service is completely free and just requires a Merchant Center Account.
How does this differ from the now defunct Google Trusted Stores Program?
The new program borrows parts from the old system, but sets out on its own to create a much more streamlined and user-friendly service.
Like Google Trusted Stores, the new service will continue to be free to use. It will also include the seller ratings.
But that’s where the similarities end. The consumer protection part of Trusted Stores has been retired and the Trusted Stores icon is no longer appearing in ads. The new program is also accessed from within your Merchant Account. This means that you no longer have to hold a separate account.
One of the major differences is the inclusion of the Google Customer Review badges. These customizable badges can display your store’s unique seller rating anywhere on your website. The new program is also different from standard Google reviews in that customers must purchase something to be offered the opportunity to review it.
How do Google Customer Reviews work?
The new Google Customer Reviews Program has four key parts:
- Google Customer Reviews Opt-in
- Google Customer Reviews Survey
- Google Customer Review Badges
- Google Customer Review seller ratings
Here’s how they all fit together…
An offer appears to all of your customers after they have made a purchase on your website. If they opt in to Google Customer reviews, Google will send them an email asking them to rate their experience of shopping in your store.
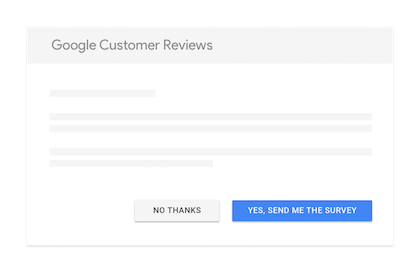
The survey they get sent is a brief questionnaire asking them to rate their shopping experience between one and five stars on several categories. They may provide free text comments as well, if they wish.
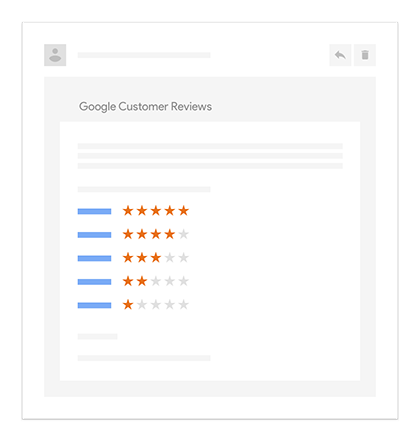
Using the data from the Google Customer Reviews survey, Google will generate an aggregate score that appears on your search ads.
![]()
The score will also appear on the Google Customer Reviews badge. You can insert this dynamic code on any page you choose and it will display a badge similar to the one above. When a user clicks on the badge, it will take them to a Google page that displays a breakdown of your star rating as well as specific customer reviews.
What’s good about Google Customer Reviews?
The new review system goes someway to getting rid of review fraud. Previously, anyone could leave a review about a store, regardless of whether or not they had made a purchase. Now, only customers who make purchases will get the chance to leave a Google Customer Review.
Being able to display the Google Customer Reviews badge on your website can increase brand trust significantly. There’s also increased flexibility to go alongside this. Previously, in Google Trusted Stores, you had to display your badge. There is no such requirement with Google Customer Reviews, you are free to show it or hide it as you please.
The new system will also help you to collect valuable customer reviews and data easily. By looking at the breakdown of your review score, you’ll also be able to understand what you are doing well and identify the areas that you need to improve.
The new system still doesn’t stop false or negative reviews completely. After all, it wouldn’t be much trouble for an underhand competitor to buy a cheap product and then leave a terrible review.
The number of reviews required for your Seller Rating to be shown has also increased from 30 to 150. This is a huge leap and spells bad news for new and small businesses who are already facing tough competition from national stores with huge marketing budgets.
Am I eligible for Google Customer Reviews?
Google Customer Reviews is only available to online stores that have a separate order confirmation page and which meet the following criteria:
- Website must be able to add JavaScript code to all pages
- Shopping basket pages must be hosted on your own URL
- Website’s order confirmation page must be encrypted (accessed using HTTPS)
How to migrate to Google Customer Reviews
If you already had Google Trusted Stores, there are three possible migration scenarios. They are:
- Automatic migration – If you already have a Google Merchant Account
- Manual Migration – Determine which Google Merchant Account you wish to use for Google Customer Reviews if you have more than one
- Manual Migration – Create a Google Merchant Account if you do not already have one. You can sign up for an account here
The good news is that most trusted stores accounts should be migrated automatically.
The Trusted Stores administrator for your online store should already have received an email outlining what steps, if any, they need to take to migrate your Trusted Stores account to Google Customer Reviews.
How to enable Google Customer Reviews
If you don’t have a Google Trusted Stores account, signing up to Google Customer Reviews is quick and easy. In fact, it’s a heck of a lot easier than signing up to Google Trusted Stores used to be!
Here’s how you can get started:
- Log in to your Merchant Center Account
- Click Merchant Center programs from the dropdown menu
- Click “Get Started” and accept the Program Agreement
- Add the survey opt-in code to your website. See below for more information…
How to integrate survey opt-in module
The opt-in module allows customers to choose whether or not to take part in the review program and submits transaction data to Google.
Correctly integrating the opt-in module is therefore vital. Here’s how to get it right first time.
The process is pretty straightforward. You simply need to update the DOCTYPE and add the opt-in code.
You need to place the opt-in code on the order confirmation page of your checkout flow. Please note, if you don’t have an order confirmation page you won’t be able to use Google Customer Reviews. Remember all confirmation pages should also use HTTPS.
First, you need to update your confirmation page so that is uses the following
HTML5 DOCTYPE:
<!DOCTYPE html>
Doing so ensures that web browsers render the page in standard mode instead of quirks mode.
Adding the opt-in code into the HTML of your confirmation page gives customers the option of submitting a review about their buying experience. To do so, paste the following HTML snippet into your order confirmation page:
<!– BEGIN GCR Opt-in Module Code –>
<script src=”https://apis.google.com/js/platform.js?onload=renderOptIn”
async defer>
</script>
<script>
window.renderOptIn = function() {
window.gapi.load(‘surveyoptin’, function() {
window.gapi.surveyoptin.render(
{
// REQUIRED
“merchant_id”: MERCHANT_ID,
“order_id”: “ORDER_ID“,
“email”: “CUSTOMER_EMAIL“,
“delivery_country”: “COUNTRY_CODE“,
“estimated_delivery_date”: “YYYY-MM-DD“,
// OPTIONAL
“opt_in_style”: “OPT_IN_STYLE“
});
});
}
</script>
<!– END GCR Opt-in Module Code –>
Place the snippet just before the closing </body> tag. If you have the badge code on your page, too, the order of the snippets does not matter.
Replace all of the values in red with your site-specific dynamic values:
- MERCHANT_ID = your Merchant Center ID
- ORDER_ID = A unique ID for the order
- CUSTOMER_EMAIL = The customer’s email
- COUNTRY_CODE = the two-letter country code for the customer’s country. US or UK for example
- YYYY-MM-DD = The estimated delivery date for the order
- OPT_IN_STYLE = An optional field that specifies how the dialog box is displayed.
Finally, specify the language that the opt-in module should use by pasting the following code:
<!– BEGIN GCR Language Code –>
<script>
window.___gcfg = {
lang: ‘LANGUAGE‘
};
</script>
<!– END GCR Language Code –>
The opt-in form supports the following languages:
- af
- ar-AE
- cs
- da
- de
- en_AU
- en_GB
- en_US
- es
- es-419
- fil
- fr
- ga
- id
- it
- ja
- ms
- nl
- no
- pl
- pt_BR
- pt_PT
- ru
- sv
- tr
- zh-CN
- zh-TW
If you do not specify the language, the opt-in module will use a language based on the browser’s language setting
Integrating the Google Customer Review Badge
Google lets you build trust on your online store by integrating the Google Customer Review Badge.
Unfortunately, they don’t provide many ways to incorporate the badge in your website. You can only add the badge to the bottom left or right-hand corners of pages, or inline with another element.
You can integrate the Google Customer Review Badge on your website in the same way as the opt-in module.
The same two-step process applies: check and update your DOCTYPE, then add the GCR badge code.
To add the badge to the bottom left or right hand corner of a page, add the following code snippet into the page’s HTML:
<!– BEGIN GCR Badge Code –>
<script src=”https://apis.google.com/js/platform.js?onload=renderBadge”
async defer>
</script>
<script>
window.renderBadge = function() {
var ratingBadgeContainer = document.createElement(“div”);
document.body.appendChild(ratingBadgeContainer);
window.gapi.load(‘ratingbadge’, function() {
window.gapi.ratingbadge.render(
ratingBadgeContainer, {
// REQUIRED
“merchant_id”: MERCHANT_ID,
// OPTIONAL
“position”: “POSITION“
});
});
}
</script>
<!– END GCR Badge Code –>
As before, place the code before the </body> tag.
Again, replace the red values with the following site-specific dynamic values:
- MERCHANT_ID = Your merchant ID
- POSITION = Your chosen location of the badge. Enter “BOTTOM_RIGHT” to float the badge into the bottom right hand corner of the page, “BOTTOM_LEFT” to float it to the bottom left hand corner of the page and “INLINE” causes the badge to appear in the place in which the code appears.
Once again, you have to specify the language the badge uses.
Place the following code into the HTML and then choose the language parameters from the list below.
<!– BEGIN GCR Language Code –>
<script>
window.___gcfg = {
lang: ‘LANGUAGE‘
};
</script>
<!– END GCR Language Code –>
Supported language codes:
- af
- ar-AE
- cs
- da
- de
- en_AU
- en_GB
- en_US
- es
- es-419
- fil
- fr
- ga
- id
- it
- ja
- ms
- nl
- no
- pl
- pt_BR
- pt_PT
- ru
- sv
- tr
- zh-CN
- zh-TW
More to come from Google?
Google may well provide more details about its new review program, including how it will integrate with CMS platforms, in the coming weeks. Stay in the know by subscribing to our blog. You’ll have all of the latest Google Shopping news delivered straight to your inbox. Happy days!