

As the owner or manager of an ecommerce store, you know how beneficial it can be for your business to have a presence on Amazon.
Of course, your competitors – both large and small alike – know it, too.
While you certainly should invest a decent amount of time and energy into optimizing your presence on Amazon to maximize your organic visibility, you do have another option at your disposal:
Amazon pay-per-click ads.
What are Amazon PPC Ads, and Why Should You Use Them?
If you’ve run PPC ads on other platforms (such as Google or Facebook) before, you should have no trouble understanding how pay-per-click for Amazon works: Basically, you create ads for specific products to appear within search results when individuals use a certain term, paying for the ad only when the user clicks on your ad.
The question is, why should your ecommerce business be interested in selling on Amazon and how can Amazon PPC ads help with increasing sales?
For one thing, Amazon is by far the most popular online marketplace in the US – if not the entire world. According to a survey by CNBC during the 2017 holiday season, more than 75% of American consumers prefer using Amazon than any other online store or marketplace to do their online shopping.
To add to this, 53% of sales generated through Amazon go to third-party companies that simply use the platform as a way to market their brand. In other words, most of Amazon’s customers use the platform to find products offered by other companies – not just products created by Amazon.
Piggybacking off of these two points, there’s also the fact that those searching for products or brands on Amazon are almost certainly looking to make a purchase at some point in the near future. It is a product-focused platform, after all.
While being present on Amazon in the first place can be majorly beneficial to your brand, advertising on Amazon via PPC ads can be even more so. On the one hand, if you’re utilizing Amazon ads, but your closest competitors aren’t, you’ll clearly have an advantage over them in terms of generating visibility. If your competitors also use Amazon ads, you can beat them at their own game by optimizing the various aspects of your campaigns…
Which is exactly what we’ll be discussing throughout this article.
A Quick Note on ACoS and ROAS
Before we dive into the meat of this guide, we should point out that gaining visibility via Amazon ads is not simply about outbidding your competitors.
In fact, going this route could cause you to go way overboard in terms of your ad spend, to the point that the sales you generate barely make up for the amount of money it cost to make the additional sales in the first place.
That said, as you begin your foray into using Amazon PPC ads, you’ll want to keep a close eye on two very important metrics:
Your Ad Cost of Sales, and your Return on Ad Spend.
Essentially, these two metrics represent the inverse of one another:
ACoS is calculated by dividing your ad spend by your revenues:
(Revenues / Ad Spend)
ROAS is calculated by dividing your revenues by your ad spend:
(Ad Spend / Revenues)
Basically, your main goal for your Amazon PPC campaigns should be to keep your ACoS to a minimum, in turn maximizing your ROAS.
That said, using ads on Amazon isn’t just about generating visibility; it’s about reaching those who have a high probability of purchasing your products.
The Many Types of Amazon Ads
Before we dig into the nitty-gritty of how to put together an effective ad campaign on Amazon, it’s important that we explain the different types of ads you can create on Amazon:
- Sponsored Product Ads
- Headline Search Ads
- Product Display Ads
- Video Ads
In this section, we’ll explain exactly what each of these look like, where they appear on Amazon, and the best use cases for each.
Before we dive in, it’s worth mentioning that the cost of each type of ad varies depending on the product(s) you choose to advertise, as well as the industry in which you operate.
As Laura Meyer, Founder of Envision Horizons explains:
“In many cases products that have a higher price point covert better on Headline Search Ads, while more competitively priced items convert better on Sponsored Product Ads. It really depends on the category. along with how competitive the space is.”
For this reason, we won’t dive too deep into a discussion of pricing when comparing each type of ad.
At any rate, let’s get started.
Sponsored Product Ads
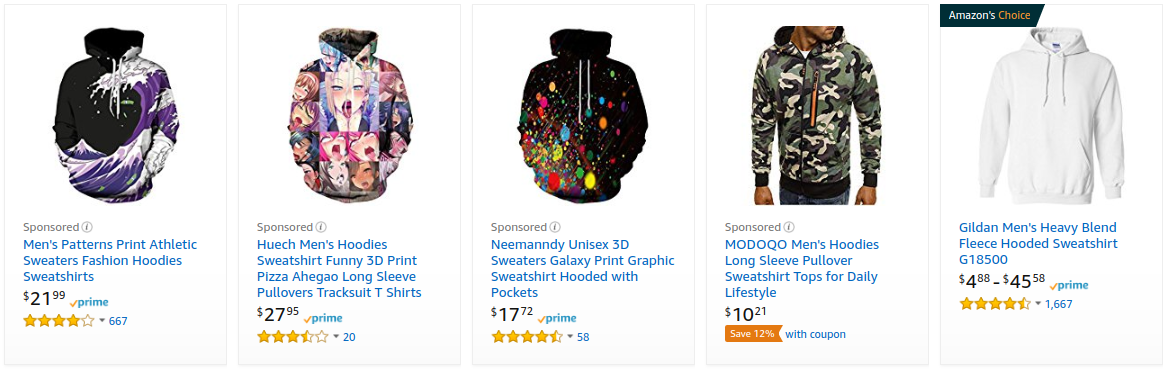
As the name implies, Sponsored Product Ads are pay-per-click ads used to promote individual products based on the keyword or phrase used by an individual Amazon shopper.
Sponsored Product Ads are visible on Amazon search results pages:
(Source)
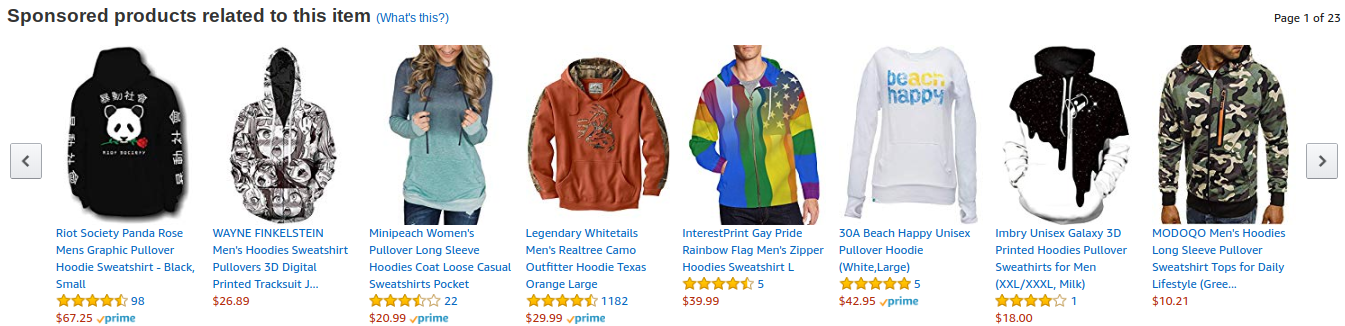
And also on related product detail pages:
(Source)
Sponsored Product Ads allow you to immediately boost visibility of products you offer that relate to a given consumer’s interests and/or search intent. This visibility is boosted even further on search results pages, as Sponsored Product Ads appear at the top of the list of results – above even top-rated or best-selling product results.
The main disadvantage of Sponsored Product Ads is that, by nature, they can only include one product – meaning you’ll have to pay for multiple ad spots if you’d like to advertise two or more similar products.
Headline Search Ads
Headline Search Ads are pay-per-click ads that are also triggered when an individual searches for a specific keyword or phrase, but they are a bit different in nature from Sponsored Product Ads.
While Headline Search Ads do also appear on search results pages on Amazon, they’re used to advertise an entire brand – not just a single product:

(Source)
As shown in the image above, Headline Search Ads consist of the brand’s logo, a custom headline, and up to three products related to the search term used. These ads appear at the very top of a search engine results page – above even Sponsored Product Ads.
In addition to providing major visibility, Headline Search Ads allow you to showcase more than one item without having to create and pay for multiple ad spots. Furthermore, since Headline Search Ads allow you to present your brand’s logo, as well as a branded message from your company, this is a great option for companies looking to increase brand awareness and recall.
However, Headline Search Ads are not without their share of drawbacks.
For one thing, they typically cost much more than Sponsored Product Ads (with good reason, as mentioned above). That said, companies operating on a strict budget might have to pass on using Headline Search Ads until they’re ready to ramp up their ad spend.
Additionally, Headline Search Ads direct searchers to a company’s main Amazon page (rather than to a specific product page). While this isn’t necessarily a bad thing, it does mean that those looking to check out a specific item will need to take an additional step along the way. In other words, Headline Search Ads may end up creating more “work” on the consumer’s end – which isn’t something you ever really want to do.
Finally, because Headline Search Ads showcase multiple products, you’ll likely want to end up using broader search terms that relate to each of these products (rather than using a more specific keyword that relates to only one of them).
Still, a well thought-out Headline Search Ad can certainly lead to major visibility for your brand as a whole.
Product Display Ads
Product Display Ads are another form of Amazon PPC ad, but they operate differently than Sponsored Product Ads or Headline Search Ads.
Instead of being triggered by search terms used by Amazon shoppers, Product Display Ads are triggered based on an individual customer’s interests and on-site actions.
As the creator of a Product Display Ad, you can set your ads to be displayed when individuals visit a certain product detail page (e.g., that of a product being offered by one of your competitors), or when they visit a product detail page of a product that falls into a specific category. Choosing the latter option, you’ll be able to choose certain categories from Amazon’s browse tree to target.
Product Display Ads appear directly below the “Add to Cart” button on product detail pages:
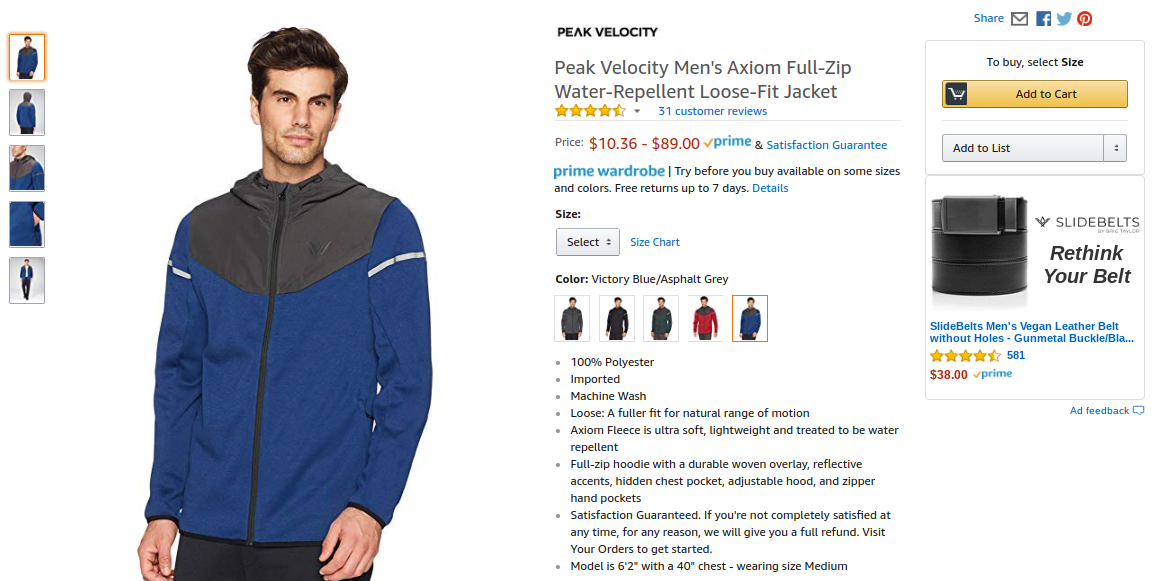
(Source)
(Note: In the example above, you’ll see that Slidebelts chose to advertise its product on a product detail page for a related item, rather than a competitor’s.)
Product Display Ads are useful because they allow you to go beyond targeting keywords, taking the context of an individual’s online shopping session into consideration as well. Along with this, the proximity of Product Display Ads to the “Add to Cart” button all but ensures your product will be seen by those who are just about ready to make a purchase. While, as we said earlier, most Amazon users are in “buying mode” as it is, those who are hovering near the “Add to Cart” button are, for all intents and purposes, as close as possible to converting – making this the perfect spot to advertise your products.
As for the downsides:
Since you, the ad creator, will define which specific product detail pages your Product Listing Ads appear on, you’ll need to be extra diligent when making this decision. That is, you’ll need to do some heavy research in order to know the optimal spot to place your ads.
Also worth noting is that, although Product Listing Ads provide a pretty good opportunity for you to gain visibility among high-purchase intent consumers, such individuals are few and far between (when compared to, say, the amount of people who are likely to see your Sponsored Product Ads and Headline Search Ads). In other words, Product Display Ads might not be your best option if you’re going for a “wide net” approach.
A Quick Note on Video Ads
Amazon also allows ecommerce store owners to create video ads showcasing their brand’s products, to be displayed via Amazon’s website, mobile app, and Fire tablet wake screen.
However, as video ads are not pay-per-click in nature, we won’t be covering them, here.
Best Practices for Creating PPC Ads on Amazon
Now that we’ve explained the various types of ads you can create on Amazon, we’re going to discuss how to actually create Amazon ad campaigns that generate visibility for your brand in the hopes of increasing sales numbers.
“Amazon’s PPC advertising is still very rudimentary. There isn’t geo targeting, day parting, demographic layers, etc. The only optimizations that can made to campaigns is changing the keywords, bids and structure of a campaign.” – Laura Meyer, Founder, Envision Horizons
With that in mind, the remainder of this article will focus on what you can optimize for when creating PPC ads on Amazon:
- The process of finding and using the right keywords within your ads
- Optimizing your product listings to increase the chances of generating conversions from your ads (as well as organically)
Let’s dive in.
Keyword Optimization
To be sure, simply using Amazon ads won’t automatically lead to an increase in visibility or conversions.
For one thing, if you’re targeting keywords that nobody uses, your ads aren’t even going to show up for anyone at all. Along with this, using “weak” keywords (which we’ll discuss in a bit) might lead to an increase in visibility, but probably won’t lead to an increase in conversions – which, of course, is the ultimate goal of running your ad campaigns in the first place.
All this being said, you’ll want to choose your targeted keywords carefully and strategically, so that your ads appear to the right customers at the exact moment their purchasing intent is highest.
Here’s how to get started.
Begin With an Automatic Campaign
For those just getting started with Amazon PPC ads, the best course of action is to begin by creating ads using Amazon’s automatic targeting option.
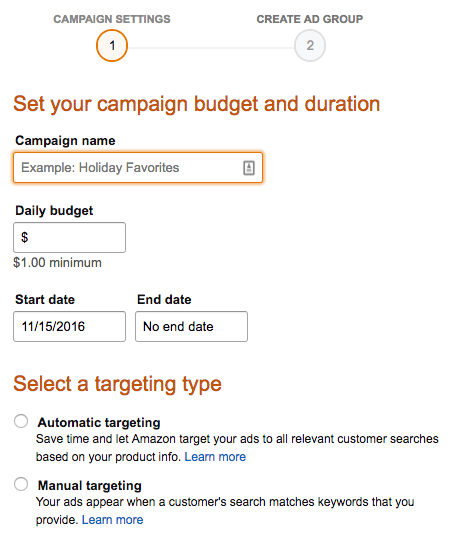
(Source)
According to Amazon Advertising’s help page, the automatic campaign option allows Amazon Marketing Service advertisers to “take advantage of Amazon’s search shopping intelligence by creating Sponsored Products auto-targeted ads. When you create automatic targeting Sponsored Products ads, an Amazon algorithm will collect and use highly relevant keywords for all selected SKUs in an automated way.”
(Note: The Automatic Campaign option is only available for Sponsored Product Ads. With that in mind, if you’re brand new to Amazon PPC ads, this option should be your first stop.)
At any rate, when running an Automatic Campaign, you’ll choose which products to advertise throughout the campaign, and Amazon’s algorithms will determine the optimal keywords to focus on for the campaign based on the items you’d manually chosen.
By using the Automatic option, you’ll be able to quickly get your first campaign up and running without having to do much (or any) keyword research on your own. While you’ll eventually want to invest the time and energy it takes to create campaigns manually, this will act as a sort of primer to ensure that you’re heading in the right direction when you do so.
While Amazon will automatically generate a new search terms report for you every few days, you’ll generally want to allow your Automatic Campaign to run for a week or two before you make any sort of decision based on the information you’ve collected thus far. After 10-14 days have passed, though, you’ll be ready to check out your Search Terms Report.
(A quick note: You can also use tools like Sonar to find relevant and valuable keywords to focus on.
Check Your Search Terms Report
Located within Amazon’s Seller Center dashboard, you’ll find your Search Terms Report, which will provide with information regarding:
- The total number of impressions your ads generated
- The total number of clicks your ads generated
- The total number of conversions your ads generated, as well as total revenues generated by your ads
- Information regarding metrics such as cost per click, click-through rate, and conversion rate
With the Search Terms Report, you’ll be able to determine which specific search terms have generated the most impressions, clicks, and conversions. As we mentioned above, this will give you a good idea of which terms to focus your ad spend on as you begin to take manual control of your campaigns.
One thing to note, however, is that Amazon’s Search Terms Report no longer tells you which products have generated the most engagement and sales throughout your campaign. Rather, the report explains which keywords, out of the ones Amazon automatically chose for your ads to focus on, have been the most effective.
This means you’ll need to get a bit more granular by comparing your Search Term Report data with your sales data, looking for a correlation between an increase in sales of a specific product (or products) and engagement with ads relating to certain keywords. For example, if your Search Terms Report shows heightened engagement for the keyword “men’s hoodies,” you’d want to consult your sales reports to see which hoodie (or hoodies) have been selling better over the same time period.
Now, after you’ve dug up and analyzed all this data, you’ll want to categorize your most effective keywords by match type…
Understand the Different Keyword Match Types
When defining which keywords will trigger your Amazon ads when used by potential customers, you’ll have three options:
- Broad match
- Phrase match
- Exact match
Let’s take a look at how and why you should use these options when defining keywords for your ads.
Broad Match
Broad match keywords are intended to reach a rather wide range of audiences – hopefully capturing the attention of ToFu customers who may simply be browsing for a category of products, but who don’t know exactly what they’re looking for just yet.
Ads focusing on broad match keyword phrases can be triggered when an individual’s search term includes any (or all) of the words within the phrase in any order. These ads can also be triggered even if an individual includes extra keywords within their search term.
For example, if you set the keyword “cookie jar” to broad match, the ad may appear for those who search for “cookie jar,” “yellow cookie jar,” “ceramic jar for cookies,” or any variety of similar terms.
Using broad match keywords is a great way to determine which keyword variations are leading to the most engagement and conversions. For example, let’s say that you notice your ad often shows up for individuals who search for “ceramic jar for cookies,” and a decent percentage of those who use this term end up purchasing your product. This would tell you that “ceramic jar for cookies” is a high-quality keyword for your product which you should focus your ad spend on moving forward.
(Note that when you use Amazon’s Automated Campaign option, your keywords will be set to broad match. As we said earlier, the automated setting is a great way to discover which keywords to focus on; this is exactly why that is.)
Phrase Match
Phrase match keywords are meant to reach individuals whose search query includes your specific keyword phrase in order. These search queries can include other words or phrases, but they must include your keyword phrase in the order you define it.
So, if your ad is targeting the keyword “ceramic cookie jar,” and you set the keyword to phrase match, the ad can be triggered when individuals search for:
- “Yellow ceramic cookie jar”
- “Large ceramic cookie jar for Christmas”
- “Christmas ceramic cookie jar”
However, your ad would not show up for terms like “ceramic yellow cookie jar” or “ceramic Christmas cookie jar.” Again, the specific phrase you use must be included in your potential customer’s search term to be triggered.
That said, you’ll want to funnel many of your best-performing broad match keywords into your phrase match campaigns, as you’ll have proof that these keywords are being used by individuals who have a higher purchase intent than the run-of-the-mill, “just browsing” consumers.
Exact Match
The exact match setting goes a step further, in that it ensures an ad will only appear when an individual uses the exact phrase as defined by you.
So, if your exact match keyword is “ceramic Christmas cookie jar,” your ad will only show up when an individual search for “ceramic Christmas cookie jar.” No variations or additional words can be used – it must be the exact phrase.
That said, you only want to use the exact match option for your most valuable keywords: the ones that almost always lead to a conversion. Looking at things from the customer’s perspective, these are the keywords an individual uses when they know the exact type of product they’re looking for, and are now looking to choose a single product from the selection provided.
(As you can probably guess, using the exact match option will drastically decrease the amount of impressions you generate – since less people will use the exact phrase than an accompanying broad match phrase. Once again, though, the impressions you do generate will almost certainly be from individuals with a very high intent to make a purchase.)
A Note on Negative Keywords
Now, in addition to defining which keywords you want your ads to show up for, you’ll also want to define the search terms you don’t want your ads to show for.
These negative keywords are those which may seem to be related to a specific product you offer, but don’t actually relate to a searcher’s intentions.
For example, if you’re creating an ad focused on the keyword “women’s shoes” (and your product is women’s walking shoes), you wouldn’t want this ad to be shown to those who use the search term “high heels.” If you don’t specifically define “high heels” as a negative keyword, there’s at least a chance that Amazon’s algorithms may present your “women’s shoes” when an individual searches for “high heels,” since the two terms are closely related.
Essentially, defining negative keywords acts as a safeguard against wasting ad spend on accidental clicks from customers who have no intention of actually purchasing your product. Again using the above example, if an individual searching for “high heels” is presented with your ad for women’s walking shoes, even if they accidentally click your ad, it will still cost you at least a bit.
(And, of course, if it happens multiple times, the cost of these accidental clicks will easily pile up.)
At any rate, you can use your Search Terms Report to begin defining your negative keywords by looking for terms that generate a high number of impressions, but a low number of clicks. In turn, this will also allow you to sharpen your focus on the keywords that are proving to be effective, as well.
Optimizing Your Product Listings
Now, if your ads do start appearing for the right keywords, this will hopefully serve to get your target customers to click over to your product detail pages.
However, this doesn’t necessarily mean that these individuals will actually go through with a purchase. The quality of your product detail pages also plays a major role in your potential customer’s purchasing decision.
That said, you want to be absolutely sure that your product pages are highly detailed, appear professional in nature, and truly capture the essence of the product you’re offering.
To illustrate this point, let’s check out the product page for a rather mundane product: Post-it Notes.
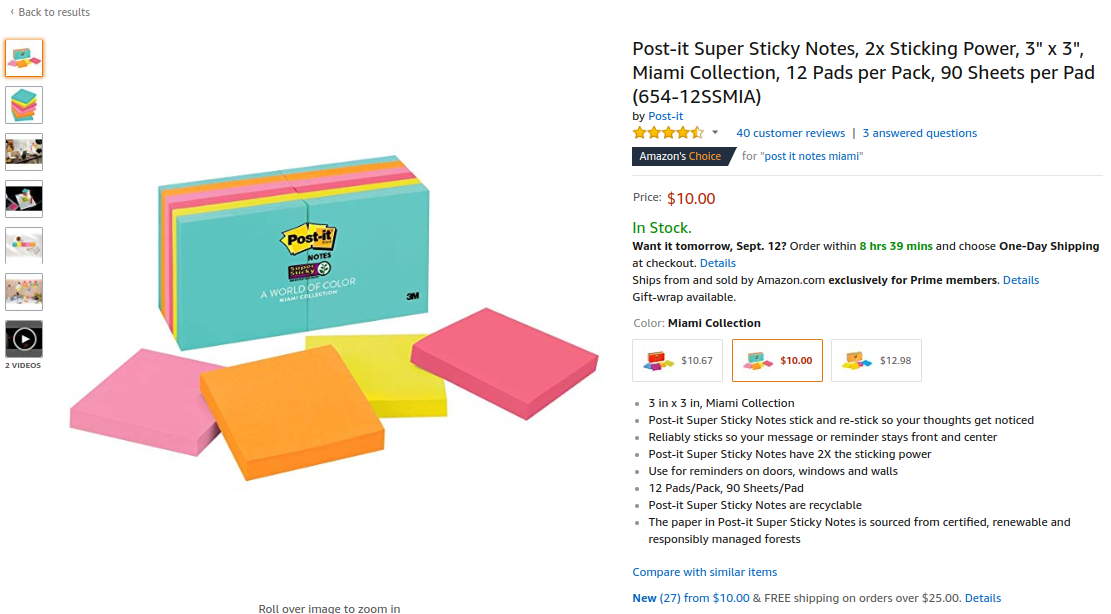
(Source)
In the following sections, we’ll take a closer look at the most important aspects of this product page.
Product Title
To be clear, the Product Title section of your product page should include much more information than just…the title of your product.
Here’s the “title” from the Post-it Notes example:

As you can see, there’s a ton of information packed into less than 200 characters, here, including the product’s:
- Brand name
- Model/version name
- Key feature(s)
- Size/dimensions
- Quantity per order
Also note that your product title should include the most relevant – and most valuable – keywords that apply to the product in question. Additionally, these keywords should appear at or near the beginning of the title. The example above illustrates this clearly, showing “Post-it” and “Super Sticky Notes” before providing more specific details about the product.
By presenting this essential information right upfront, you make it easy for your potential customers to determine if your product is what they’re actually looking for (which, if it is, they’ll continue to dig deeper in order to make a purchasing decision). On the other hand, if your product title is rather generic and uninformative, your target customers will almost certainly pass over your listing – even if your product is exactly what they’re really looking for.
Product Description and Key Features
Another important aspect of your product page is the product’s key features and description.
Again, let’s revisit our example from Post-it:
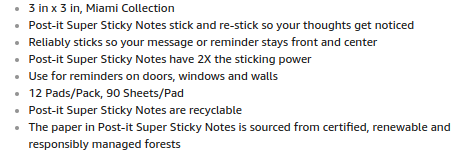
Here, the company provides a mix of features and benefits listed together in bullet form. While there is no single way to put together your product descriptions, there are a few best practices to follow, here:
- Provide pertinent information regarding the product’s physical makeup (even if you already included it in the product title)
- “Marry” features and benefits, so your audience can easily understand why a specific feature is important to them
- Provide information about your brand’s story, causes your organization champions, etc. that relate to your product
- Use emotional and sensory copy – but avoid being “salesy”
Also, again, be sure to include your most relevant and valuable keywords within your product descriptions – but do so in a natural way without unnecessarily stuffing phrases that don’t fit.
(A quick note: You have an additional opportunity to provide further details within the Product Description section of your product detail page, which will be located a bit further down the page. Here, you’ll want to reiterate the key features and benefits of your product, and any other information that will help nurture your target customers toward converting.)
Finally, you also want to fill out as much of the section on Technical Details as you possibly can:
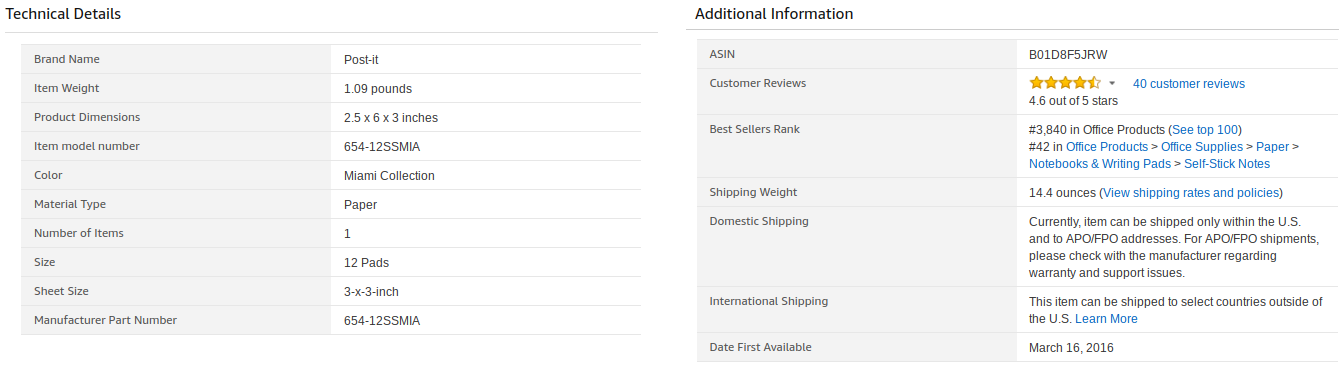
Let’s put it this way:
If Post-it has that much to say about its relatively simple products, then you can certainly do the same for yours.
Product Photographs
Along with providing detailed descriptions of your products, you also want to provide your customers with photographs of your products that are equally as detailed.
Again, let’s go back to Post-it’s product page for some examples:
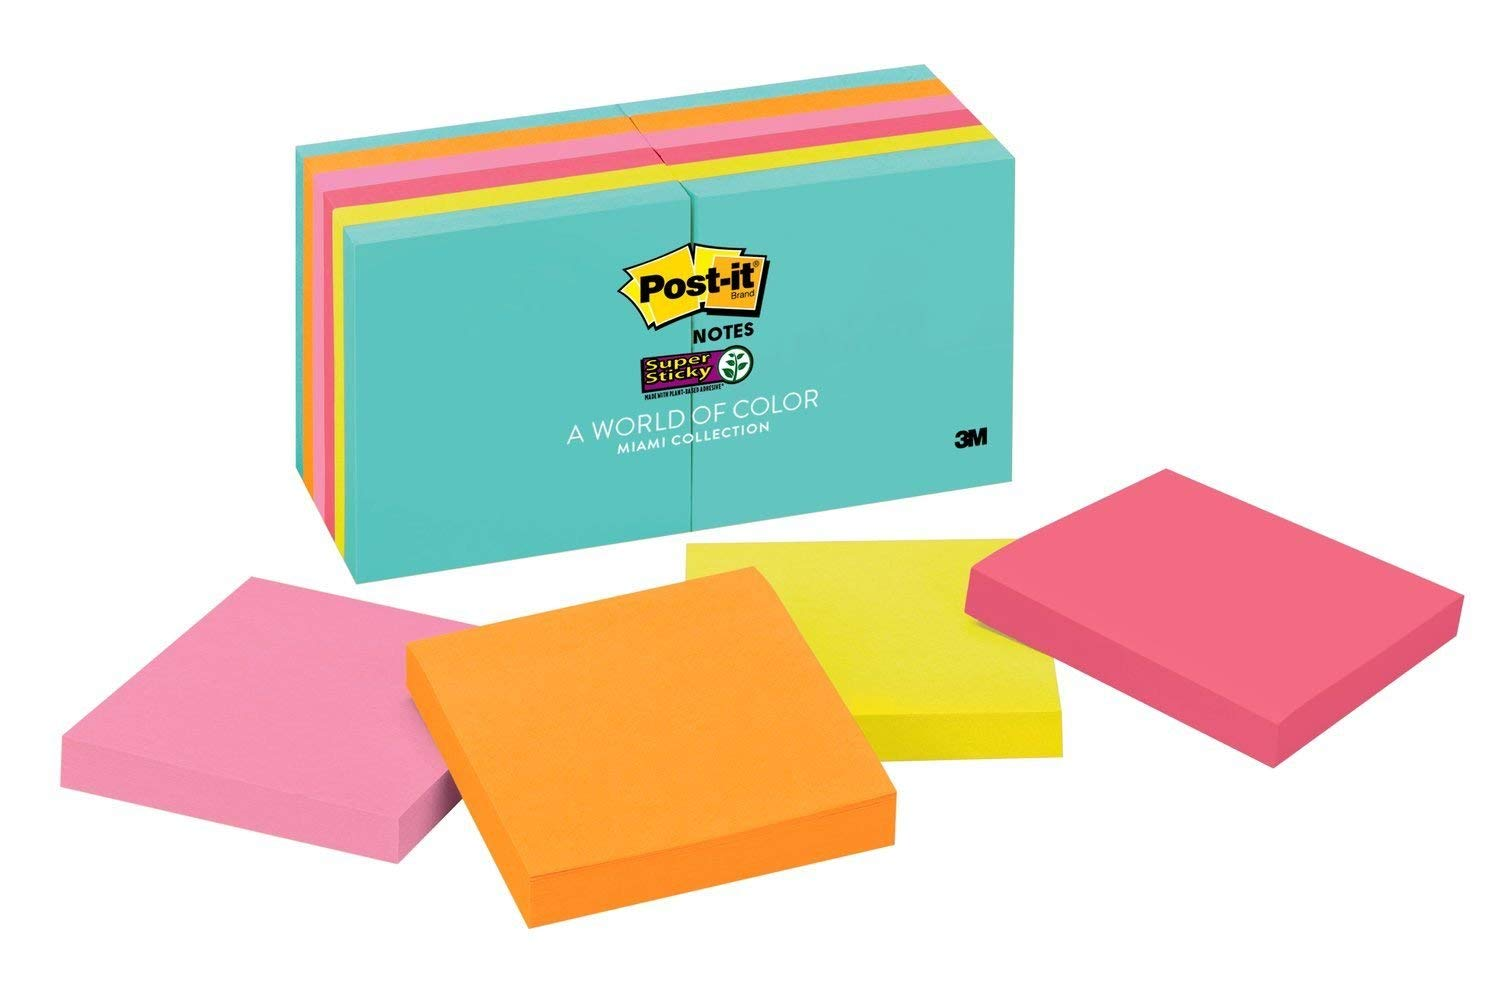


As you can see, you have a ton of options when it comes to visually showcasing your products. You’ll want to include a mixture of standalone photographs (such as the first example in the above series) and lifestyle or action shots (i.e., the second and third of the above photos). You can also include videos of your products if you choose.
Also, be sure to showcase your product from multiple angles, and to create photos focusing on specific features of your product as necessary. For example, if you sell jewelry, you’ll want to take up-close photos of the products in order to showcase their true quality.
Once again:
If Post-it can bring its Super Sticky Notes to life using high-quality, vivid photographs, you should certainly be able to do so with your products.
As for the logistics:
- Try to include at least nine photographs (again, mixing up the type of photo, as well as the angle and zoom of each)
- Make sure your main photograph is at least 2000px resolution; the rest can be 1000px or more
- Use only JPG or TIF format when uploading your photo files
For more information regarding product photography in general, check out this post on Sales & Orders’ blog.
Ad Copy
For Sponsored Product Ads and Product Display Ads, your ad copy will basically consist of your Product Title, along with some select information about your product.
Case in point, here’s how the Super Sticky Notes appear in Amazon’s search listings:

Again, we want to reiterate the importance of aligning the copy of your product title with the actual product being offered, as well as with the keywords you’re seeking to reach with said product.
(Quick note: The above listing isn’t a sponsored ad, but it’s worth mentioning I easily found this listing by searching for “654-12SSMIA.” This may or may not have been so easy had Post-it had not included this item number in the product title, here.)
Now, things are a bit different when it comes to Headline Search Ads. As a quick reminder, these ads appear as banners above search results, allowing you to showcase multiple products, as well as your brand overall.
Here’s what comes up when you search Amazon for “Post-it”:

(Source)
While essentially the same (as far as the actual product listings go), Headline Search Ads allow for a little bit of creativity. As shown in the example above, Post-it includes the tagline “Make it Stick with Post-it” within the branded section of its Headline Search Ad. You might also decide to take a more “salesy” approach, as Gillette does here:

(Source)
In this regard, there’s no “one way” to go about creating the copy for your Headline Search Ads. That said, you’ll want to test different approaches over time, tweaking along the way in order to maximize engagement among your target audience.
A Note On Autoresponse Emails
Before we wrap up, we want to mention the importance of setting up emails to be automatically sent to individuals once they’ve gone through with a purchase.
(To be sure, this is good practice for anyone using Amazon to sell products – whether you utilize PPC ads or not.)
Basically, you’ll want to send emails at the following times, for the following purposes:
- One business day before the product is scheduled to arrive, you should send an email thanking your customer for their purchase
- 24 hours after the product has been received, you’ll want to solicit a review from your customer (whether pertaining to the product, the delivery process, or any ancillary services they’ve received from your company)
- If they don’t respond to your request for feedback, send a reminder after 48 hours have passed
The reason for sending these autoresponse emails is twofold:
First of all, it’s simply good practice to stay in touch with your customers as much as possible. Whether assuring them that their order will arrive shortly, or checking in to ensure they’ve been able to utilize the product successfully, these follow-up emails allow you to forge and maintain a relationship with all of your customers – no matter where they may be located.
Secondly, by generating product reviews and other such feedback, you’ll gain a better understanding of what your company is doing right – as well as where there may be room for improvement. Going along with this, you can also use positive reviews as social proof to be displayed both on your Amazon pages, as well as your company’s own website as well.
One thing to note, here:
While it’s perfectly fine to send these automated responses as a springboard to further engagement, you should aim to manually take over the conversation should your customer reach back out to you for any reason at all. Not only will this further the level of engagement you generate with your customers, but it will also prove to them that they can trust your company to assist them as best as possible moving forward.
Wrapping Up
As we’ve said, gaining a presence on Amazon can be incredibly beneficial for your ecommerce business.
But it’s not just about getting your products in front of a ton of eyes; it’s about getting them in front of the right eyes.
By following the strategies and tactics we’ve discussed throughout this article, you’ll not only be able to cast a wide net into the enormous sea of Amazon customers – but be able to catch the attention of those who best fit your target personas, as well.